
In this article:
- What is call time?
- What is Call Time by ActBlue?
- Who can use Call Time by ActBlue?
- How do I set up Call Time by ActBlue?
- How do I build my call list?
- How can I search or filter contacts?
- How can I add contacts from outside ActBlue?
- How do I make and log calls?
- How can I turn pledges into donations?
What is call time?
Call time refers to the dedicated hours a candidate spends making fundraising calls - typically to previous donors, potential supporters, and party contacts. It's one of the most fundamental parts of running for office.
Most campaigns schedule call time daily, with candidates working through lists of prospects and asks managed by their finance staff or campaign manager. The goal is to hit fundraising targets that keep the campaign operational.
What is Call Time by ActBlue?
Call Time is a new product offering built directly into ActBlue that is free for all eligible campaigns and organizations. It gives you and your team everything you need to run your call time fundraising program without needing to switch to another tool!
Call Time covers three stages of your fundraising program:
- Pre-work: Building and prioritizing your contact list before you start calling.
- Call execution: Making calls with donor context visible, logging outcomes as you go.
- Follow-up: Sending donation links to turn pledges into donations.
Your initial set of Call Time contacts will automatically be made up of donors who've contributed to your ActBlue account in the past. Every time a new donor contributes to your account, they will automatically be added to your contact list. Contributions from returning donors will also be aggregated into their existing contact. No spreadsheets required, and no extra cost!
Who can use Call Time by ActBlue?
Call Time is available to all eligible accounts using core ActBlue to fundraise. If you're eligible, you'll see the Call Time tab listed on your Dashboard's left-hand menu starting June 15th, 2026:

Entity users with Admin, Finance, Data, or Donor Outreach roles will have access to this tab. Form Creator, Integrations, and Read-Only roles will not.
Not seeing Call Time? Call Time is not available to campaigns fundraising with Raise by ActBlue, or campaigns that have exceeded a volume of 1 million past contributions. If you believe you should have access to Call Time but aren't seeing it, please contact our support team.
How do I set up by Call Time by ActBlue?
The first time you use Call Time by ActBlue, you'll be walked through a short onboarding flow to ensure you understand the basics of this new tool.
Step #1: Locate the Call Time tab
To launch the onboarding flow, start by signing on to your ActBlue Dashboard and clicking the Call Time tab on the left-hand navigation bar:
Next, click the blue Get Started button:

Step #2: Set your Contact Generation Start Date
In the Call Time pop-up window, you'll be asked to choose a Contact Generation Start Date. This tells us how far back in your contribution history to look when generating your set of contacts.
-
By default, the date is set to the first day you ever received a contribution on ActBlue.
-
If you only want recent donors, you can set a more recent date.

Important: this setting is permanent. Once you set your Contact Generation Start Date, you won't be able to go back and include contributions from before that date. Choose carefully; if in doubt, leave it at the default to capture your full history.
Step #3: Configure your Current and Previous Period dates
Call Time shows aggregate donation totals for two time periods for each contact: a Previous Period and a Current Period. This makes it easy to spot lapsed donors who gave before but haven't recently.
ActBlue will pre-fill these dates based on standard election cycle logic (for 2026: Previous = 2023–2024, Current = 2025–2026). You can adjust them to fit your campaign's specific timeline.
- The Previous Period cannot start before your Contact Generation Start Date.
- The two periods cannot overlap, though a gap between them is fine.
- Federal campaigns with different pre- and post-primary max amounts may want to adjust these to reflect their specific cycle dates.

Step #4: Set your max contribution amount
ActBlue will default to the current maximum donation amount for your jurisdiction. This number is used to determine which contacts show a Maxed Out status vs. a Donated status in your contact list.
This is for reference, not compliance. The Max Out designation is directionally useful, but not a guarantee of accuracy. It's based only on ActBlue contributions and doesn't account for offline donations or intra-cycle periods with different limits. Don't use it as legal or compliance guidance; always consult your compliance team for that.
Step #5: Wait for your contacts to generate
Once you complete onboarding, ActBlue scans your contribution history and builds your set of contacts automatically. For most entities, this is a quick process. If you have a large contribution history, it may take a bit longer.

- If generation takes more than 10 seconds, you'll be offered the option to receive an email when it's ready.
- If you navigate to your Contacts table before it's done, you'll see a notice that your contacts are still being generated.
You will not see contacts generated from tandem forms contributions where the donor didn't share their information.
How do I build my call list?
Before starting a Call Time session, you'll want to build a focused list of who you're calling and what you're asking for. Call Time does most of the heavy lifting.
Your Contacts Table
The Contacts table is your full contact list in one view. Every contact generated from your ActBlue history (or imported by you) appears here. You can:
- Customize which columns you see using the column selector
- Search, sort, and filter to find the right contacts for a given session
- Edit contact details directly in the table
- Drill into a contact's profile page to see their full donation history and past call activity

Each contact shows aggregate giving totals for your configured Current and Previous periods. This is useful for identifying lapsed donors who gave before but haven't recently. You can also see when someone last donated and what the amount was.
If a contact has a green recurring symbol next to their name, that means they have an active recurring contribution to your campaign.

You can choose which columns of information you’d like to display in-line for each contact. Click Columns on the top left to expand a drop-down where you can select from the following options:

- Email: The contact's email address.
- Phone number: The contact's phone number.
- Address: The contact's address.
- City: The contact's city.
- State: The contact's state.
- Zip Code: The contact's zip code.
- Status: The contact's current Call Time status.
- Contact bio: Your team’s description of or notes about this contact.
- Total last cycle: The contact's total contributions to your campaign in the last election cycle. You will have provided the dates of your last election during onboarding.
- Total this cycle: The contact's total contributions to your campaign during the current election cycle. You will have provided the dates of your current election during onboarding.
- Ask: The dollar amount to request from this contact when your team next calls them. Your team determines and manually enters this amount.
- Last Contribution: The amount and date of the contact's most recent contribution to your campaign.
- Last contacted: The date of the most recent call logged with this contact.
The columns you check off will be displayed in the Contacts list, while the ones you uncheck will be hidden.
You can edit key information for contacts, such as their phone number or Call Time Status, in-line by clicking on it directly in the Contacts list. To edit all information for a contact, click their name to go to their Call Time contact profile.
At the end of the row for each contact, you’ll find the Actions column. You can click the button with three dots to take the following actions for a given contact:
- Log call
- Send follow-up message

You can also take these actions from a Call Time List or a contact's profile.
How can I search or filter contacts?
To quickly find a specific contact, enter their name in the Search by Name field at the top of the list:

To filter your Contacts list, click Filters in the upper right corner.

- Contact info
- Has phone number / No phone number: Whether or not the contact has a phone number listed.
- Recurring / Not recurring: Whether or not the contact has an active recurring donation to your campaign.
- Ask / No ask: Whether or not your team has entered a custom Ask amount for your next call to that contact.
- Status: The contact’s Call Time Status.
- Location
- State
- City
- Zipcode/Postal code
- Amount
- By last contribution amount: The amount of a contact’s most recent contribution to your campaign. Set a minimum and maximum amount to filter for a range.
- Total giving last cycle: The total amount the contact gave to your campaign in the last election cycle. Set a minimum and maximum amount to filter for a range.
- Total giving this cycle: The total amount the contact has given to your campaign this election cycle. Set a minimum and maximum amount to filter for a range.
- Ask amount: The Ask amount your team has set for your next call with a given contact. Set a minimum and maximum amount to filter for a range.

Select all filters you want to use, then scroll to the bottom of the dropdown and click Apply.
What are Call Time Statuses?
Each of your contacts will have a Call Time Status. This key piece of information indicates what happened during your team’s last call to the contact and/or where your team’s outreach to them stands.
Each contact’s Call Time Status will be displayed in the Status column on your Contacts page. Below is a list of all Call Time Statuses and their meaning.
|
Call Time status |
What it means |
|
Maxed Out |
The contact has already contributed the maximum they can legally contribute as an individual donor to your campaign. Our system will automatically apply this status if it detects that they have reached the individual maximum through ActBlue. |
|
Not Asking |
Set this status manually if, for any reason, this contact should not be called and asked for support at this time — for example, the contact is currently planning a fundraising event for your campaign and has their hands full. |
|
Do Not Call |
This status means a contact should no longer be contacted for any reason. |
|
Declined |
The contact declined to contribute when they were last called. |
|
Wrong Number |
The phone number listed for this contact turned out to be incorrect when your team called. |
|
Pledged |
During your team’s most recent call to this contact, they pledged to donate to your campaign. |
|
Follow-Up |
The contact has been called and now requires additional follow-up. |
|
Donated |
The contact has contributed to your campaign via ActBlue. |
|
Never Contacted |
Your team has not yet logged a call to this contact. |
|
Unassigned |
No other status has been applied. |
Several of these statuses will automatically be applied to the contact based on the result of the most recent call logged with them.
How can I add contacts from outside ActBlue?
If you have contacts who haven't given on ActBlue, you can import them via CSV. First name, last name, and either email address or phone number are required to import.
- Download the CSV template from the import screen to make sure your file is formatted correctly.
- Upload your file. ActBlue will auto-match your columns to the right fields and show you a mapping interface to adjust anything that didn't match correctly.
- Review the import summary to see how many contacts were added.
Contacts are automatically checked for duplicates against your existing list. We check for matches based on first name, last name, and either phone number or email. If a match is found, the import won't create a second record.
How can I manage my Call Time lists?
Viewing and editing call time lists
To manage your Call Time lists, go to the Call Time Lists page of your Dashboard.
Creating a call list
Rather than calling from your full contacts table, create a focused List for each session. Lists let you segment contacts, set ask amounts, and track progress as you go.
- Filter and sort your contacts table, then save the results as a List
- Set a target ask amount for each contact on your list
- Progress indicators show how far through the List you've gotten
Archiving lists
Click Archive list to move it to the Archived tab on the same page.

You can unarchive a list at any time by clicking the Action button with three dots and selecting Unarchive List.
How do I make and log calls?
Call Time is designed for candidates on the go. It's mobile-optimized so it works between meetings, in a car, or anywhere else you might have your phone! No app download is required.
Opening your List on mobile
Share the link to your List with your candidate directly. They can then open the list on their phone and start calling immediately (just make sure they're logging in)!
Making a call
Before making your call, tap a contact to see their full donor bio. This will include their contact info, past donation history, and their ask amount.
Tap the contact's phone number to initiate the call - no manual dialing required!
The donor's bio will also stay visible during the call.
Logging the outcome
After each call, log what happened. This takes a few seconds and keeps your list accurate for follow-up.
To get started, select the Actions button for that contact and clicking Log call results:
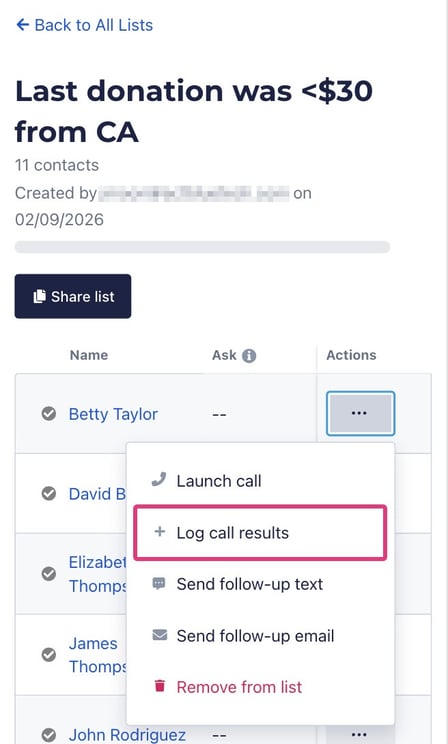
Alternatively, tap the contact’s name to return their profile and select the Log Call button at the bottom of the screen:

After you log the call and click Save, you will be returned to the contact’s profile. Use the navigation at the top of the page to select Next to move on to the next contact in the list.
Log the following information:
- Date and time: our system will autofill this information, but you can also edit it
- Result: include the outcome of the call
- Left voicemail
- No answer
- Pledged: include the amount the contact pledged to contribute to your campaign
- Follow-up needed: include whether the contact needs follow-up of some kind. Tip: record the reason in the Notes section detailed below.
- Wrong number
- Declined to donate
- Do not call: include if your team should not call this contact again
- Pledge amount: if the contact pledged to donate, enter the amount they pledged to give. Note: you can only fill out this section if the call’s Result is set to Pledged.
- Notes: include any notes from the call you would like to record for yourself and your team
Logging certain call results will automatically update the Call Time status for that contact:
|
Call Result |
Call Time Status |
|
Left voicemail |
Follow up The contact requires additional follow-up. |
|
No answer |
|
|
Follow-up needed |
|
|
Pledged |
Pledged The contact pledged to donate to your campaign. |
|
Wrong number |
Wrong number The phone number listed for the contact is incorrect. |
|
Declined to donate |
Declined The contact declined to contribute. |
|
Do not call |
Do not call The contact should no longer be contacted for any reason. |
Click the blue Save button at the bottom of the window to save your logged call results.
Once you have logged a call with a contact, the checkmark next to their name in the Call Time List will fill in green. Their Status and Call Status will update to reflect the result of your call.

Now, you can move on to the next contact in the list and repeat the process.
How can I turn pledges into donations?
The fastest way to lose a pledge is to wait! Call Time makes follow-up immediate and simple.
Send a follow-up message
Right after logging a call, you can send a follow-up email or text with a single tap.
- The message is pre-written and personalized with the contact's name.
- It includes a donation link tied to your ActBlue default form with a call time-specific refcode.
- Tapping Send email or Send text opens your mail or messages app with the recipient and message already filled in. You just hit send.
Track what's coming in
You don't have to manually check whether a pledge turned into a donation. Call Time tracks it for you.
- A contact's status automatically updates to Donated or Maxed Out when they give.
- Their last contribution date and amount update in your Contacts table.
- Call time donations made through the follow-up link are tracked via a dedicated refcode, visible on the form stats page of your default form.